Quick presentation#
This section explains when MoviePy can be used and how it works.
Do I need MoviePy?#
Here are a few reasons why you may want to edit videos in Python:
You have many videos to process or to compose in a complicated way.
You want to automate the creation of videos or GIFs on a web server (Django, Flask, etc.)
You want to automate tedious tasks, like title insertions tracking objects, cutting scenes, making end credits, subtitles, etc…
You want to code your own video effects to do something no existing video editor can.
You want to create animations from images generated by another python library (Matplotlib, Mayavi, Gizeh, scikit-images…)
And here are a few uses for which MoviePy is NOT the best solution:
You only need to do frame-by-frame video analysis (with face detection or other fancy stuff). This could be done with MoviePy in association with other libraries, but really, just use imageio, OpenCV or SimpleCV, these are libraries that specialize in these tasks.
You only want to convert a video file, or turn a series of image files into a movie. In this case it is better to directly call
ffmpeg(oravconvormencoder…) as it will be faster and more memory-efficient than going through MoviePy.
Advantages and limitations#
MoviePy has been developed with the following goals in mind:
Simple and intuitive. Basic operations can be done in one line. The code is easy to learn and easy to understand for newcomers.
Flexible. You have total control over the frames of the video and audio, and creating your own effects is easy as Py.
Portable. The code uses very common software (Numpy and FFmpeg) and can run on (almost) any machine with (almost) any version of Python.
Limitations: - MoviePy cannot stream videos (e.g. reading from a webcam, or rendering a video live on a distant machine). - MoviePy is not really designed for video processing involving many successive frames of a movie (e.g. video stabilization - there is other software better suited for that). - You can also have memory problems if you use many video, audio, and image sources at the same time (>100).
Example code#
In a typical MoviePy script, you load video or audio files, modify them, put them together, and write the final result to a new video file. As an example, let us load a video, lower the volume, add a title in the center of the video for the first ten seconds, and write the result in a file:
# Import everything needed to edit video clips
from moviepy import *

# Load file example.mp4 and extract only the subclip from 00:00:10 to 00:00:20
clip = VideoFileClip("long_examples/example2.mp4").subclipped(10, 20)

# Reduce the audio volume to 80% of his original volume
clip = clip.with_volume_scaled(0.8)

# Generate a text clip. You can customize the font, color, etc.
txt_clip = TextClip(
    font="example.ttf", text="Big Buck Bunny", font_size=70, color="white"
)

# Say that you want it to appear for 10s at the center of the screen
txt_clip = txt_clip.with_position("center").with_duration(10)

# Overlay the text clip on the first video clip
video = CompositeVideoClip([clip, txt_clip])

# Write the result to a file (many options available!)
video.write_videofile("result.mp4")
How MoviePy works#
MoviePy uses the software ffmpeg to read and to export video and audio files. It also (optionally) uses ffplay to allow for video previewing.
Internally, the representation and manipulation of the different media is done using Python’s fast numerical library Numpy. Advanced effects and enhancements also use pillow library.
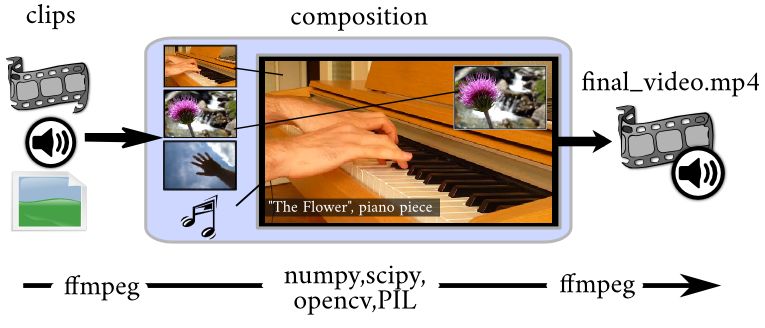
The central concept, the clips#
The central object of MoviePy is the the Clip, with either AudioClip for any audio element, or VideoClip for any visual element. Clips really are the base unit of MoviePy, everything you do is with and on them.
Clips can be created from more than just videos or audios though. They can also be created from an image, a text, a custom animation, a folder of images, and even a simple lambda function!
To create your final video, what you will do is essentially:
Load different resources as clips (see Loading resources as clips)
Modify them (see Modifying clips and apply effects)
Mixing them into one final clip (see Compositing multiple clips)
Render them into a file (see Previewing and saving video clips)
Of course, MoviePy offer multiple handy solution and tools to facilitate all these steps, and lets you add new ones by writing your own effects (see Creating your own effects)!